
As an Admin or HR Manager you can:
1.0 Filter and Change the Status of Requests
On the top bar, you can switch through leave request, according to their status, using the drop down list.
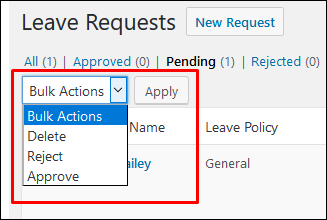
2.0 Approve, Reject or Delete Requests in Two Ways
a) The drop down (above) also works as a status changer. You can select one or more requests by ticking the checkbox on the left of each request. The select whether you want to Approve, Reject or Delete the request(s) using the drop down and confirm by clicking on ‘Apply’.
b) The second way is for you to hover on a request entry to choose.
The status panel shows the status of the request. If it’s Pending, you have the choice to Approve, Delete or Reject the request, as shown below.

If it’s Approved, you have the choice to return the request to Pending, or Delete or Reject it.

3.0 Checking Leave Requests
Using the columns called ‘Leave Reason’ and ‘Available’ (days), you can easily decide if the request is acceptable.
You can also click on the employee name and this will take you to the profile where you can view additional information.

NOTE – If your have the Pro version you can allow line managers to receive leave notifications and approve leave. You can also remove this function from selected HR Managers. Check out how to set HR and Line Manager leave capabilities here.